Notifications using the REACH Communications module
- Garry Jowett
The REACH Communications module allows you to send notifications to any individual or group of users in your boarding community easily and efficiently. The messages are sent as a "noreply" notification.
...
- Notification or Alert message to all parents
- Message to all students at a particular location, or group of locations
- Notification to all staff
- Notification to all students and parents of a particular House or Dorm
...
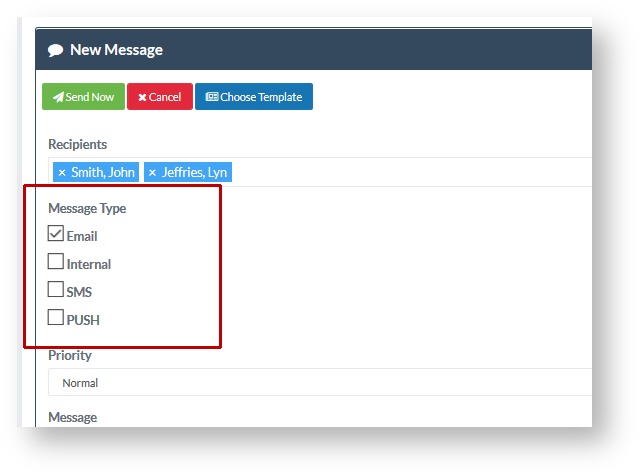
Send any combination of message modes
You can send notifications as Email, SMS, Push notification or Internal message ...... or in any combination of these methods of notification.
...
How to send notifications to your REACH users
Go to: Communications > My Inbox > New
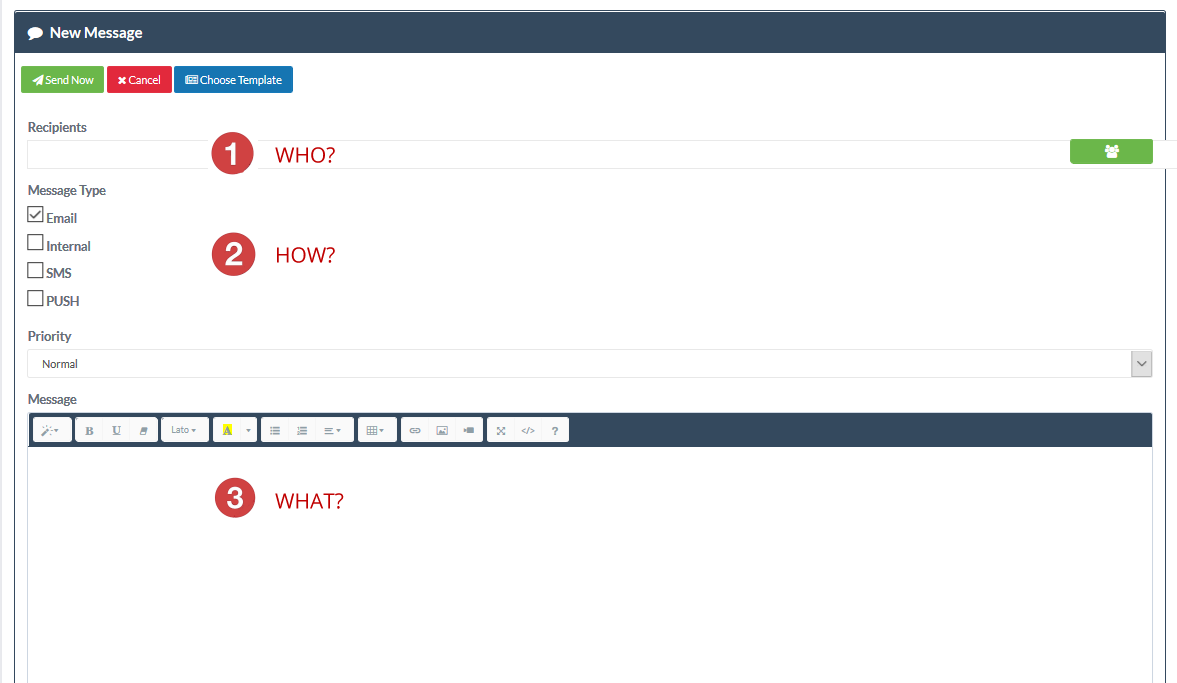
The Communications menu allows each user of REACH to send messages. Clicking on the NEW button in the My Inbox screen will provide the message details screen. Here you can select
- WHO the message will be sent to
- HOW the message will be sent
- WHAT message will be sent
 Setting who to send your notification to
When the Message details screen is open you can add the intended recipients of your notification in two way
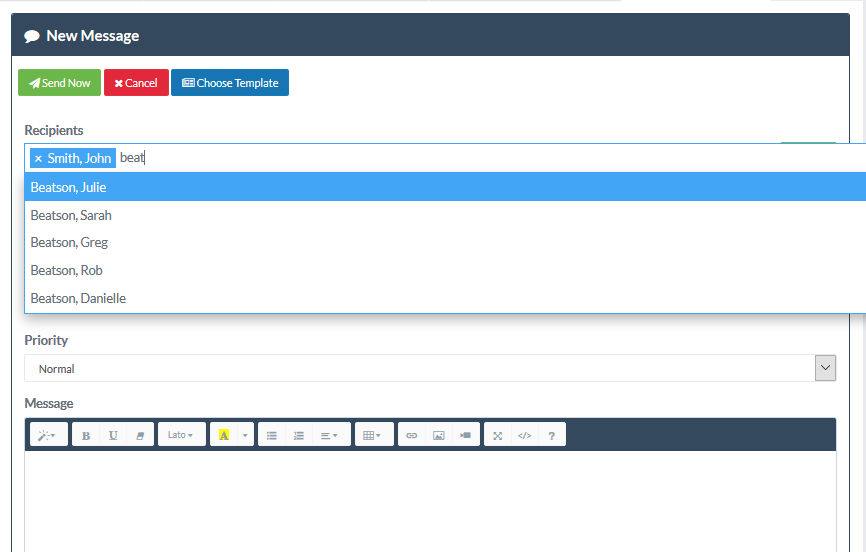
1. Add recipients individually
In the Recipients panel start adding individual names. As you begin typing a name the panel will begin to search your contacts database for users that match the name you are typing. Select the name you want to add it to the recipients list and repeat this procedure for as many individuals that you want to add to the notification list.
2. Add recipients in bulk using the bulk selector
Clicking on the Bulk Selector icon at the right had side of the Recipients selection panel allows you to select and add recipients in bulk from your contacts database. Using this method you can quickly identify groups of people (eg: all parents) that you might want to send a notification to.
...
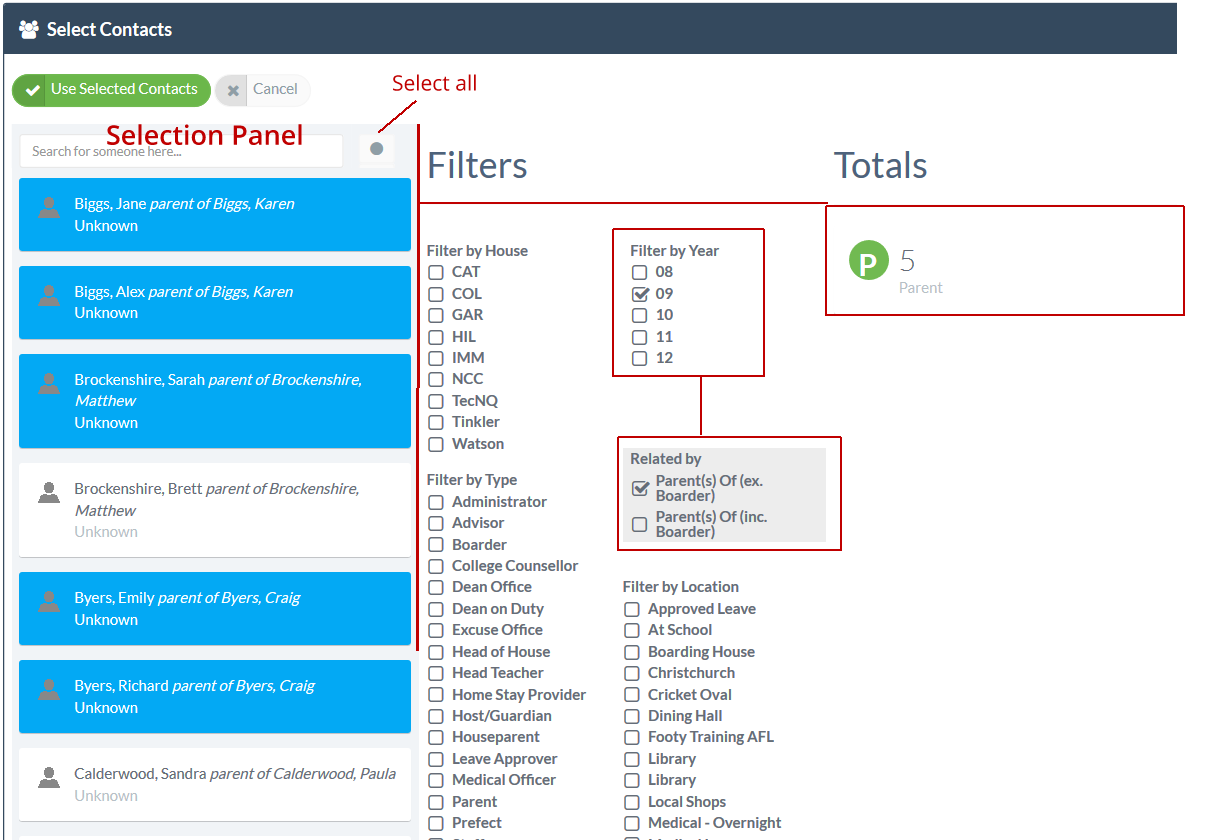
Using the bulk selector
- Clicking the Bulk Selector opens up the bulk people selector screen
- Select any relevant filters that may apply (eg: parents of a particular house, or students at a particular location)
- When the filter is set the available names that match the filter settings are listed in the selection panel
- You can use the Select all option or select individuals from the filtered selection list. The number of people selected will be identified in the Totals column on the right hand side of the filter selections.
- Once you have made your selection in the Selections panel then select the green "Use Selected Contacts" button. This will place your selected contacts into the Recipients field of your message to be sent.
- See the end of this document for details and understanding about what filter options are available and how the filtering logic works.
! Important Note The message will be sent individually to each recipient. Recipients will not see the contact details of other recipients in a bulk message notification.
...
 Setting how to send your notiification
Notifications can be sent in any one of the following ways. You can use each method individually or you can send a message in any combination of methods
- By Email to the recipient's email address
Email messages are sent as a "noreply" message and the sending email address is the same whatever email address is set as your default email for communications in your System Config > Communications > Default Email Address. - By SMS to the recipient's mobile phone number
Note that SMS messages incur a fee per message and are limited to 160 characters per message. - By Push Notification to the mobile app
Recipients will receive this message as an alert on their mobile device if they have the REACH mobile app installed and also if they have set notifications to Yes when they install the mobile app. - As an Internal Notification
Internal messages are sent to the recipient's REACH login ID only. It is important to note that not all contacts in your contacts register will have a REACH login account.
! Important Note When sending by SMS or Push notification your messag
e cannot be sent with any rich text formatting
 Setting what to send in your notification
Your message content can be sent with rich text formatting when you are sending as email only. This allows you use a range of editing function for your content such as bolding, underlining, text colour controls, background colour controls, adding images or videos and adding hyperlinks to downloadable documents.
When sending by SMS each message will be distributed with a maximum 160 characters. Anything over 160 characters will be sent as an additional message to the entire distribution list.

Bulk selection filters - Understanding how they work
Your bulk selection filters are designed to allow you to easily identify various populations of contacts in your REACH database however it is important to understand what filters are available and the logic for how these filters function.
Filters operate on a mutually inclusive logic (ie: When 2 filter options, say Year9 and Location X) are selected then only contacts that match both filter options selected will be shown ..... Year9 students at Location X). You can select from the following categories for your population filtering options:
Student specific filters
- By Houses or Dorms
- By Years or Grade
- By Location (ie: students currently at a location)
General Filters
- Type of user (ie: the role of the user)
Select a user type to send to all contacts in that user type - By any Groups that you have set up in REACH (including any temporary groups that are created by REACH Events Manager)
Special Filter
- Parents of students (including the student)
- Parents of the students (excluding the student)
...
! Important Note In general students are the only users that have House and Year filters in their profiles so when using these filters REACH will be looking at student populations.
...
Using Filter examples
- Send to all students - In filter by type select Students and then select the select all item in the Selection panel.
- Send to all parents - In filter by type select Parents and then use the select all item in the Selection panel
- Send to all parents of students in Year 11 and 12 - Select Y11 and Y12 filters and then select Parents excluding students in the special filter
- Send to all students at a particular location - Select the location and then select all in the selection panel
! Important Note Whenever you have a set of filters selected you can use the special filters for parents to identify the parents of students on that filter set (eg: parents of Y11 & Y12 students)